Share
Pin
Tweet
Send
Share
Send

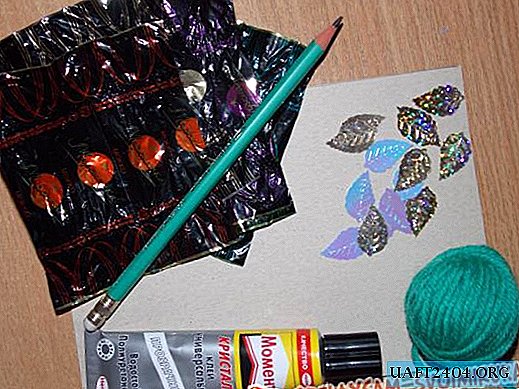
To make the stand you will need:
- threads for knitting white, red and yellow colors,
- cardboard
- scissors
- Crochet hook,
- ruler,
- pencil
- PVA glue,
- pin
- a needle
- foam rubber.
Operating procedure.
1. Cut a 21 x 21 cm square from cardboard. Measure 2 cm from each edge, draw another square inside the square and cut it out. You will get a cardboard frame. Cut another exactly the same frame.

2. Glue the frames together. This is necessary so that the frame is tight enough. Draw horizontal lines on two opposite sides, and draw dots on each line with a simple pencil at a distance of 0.5 cm from each other.

3. Take the foam, put a cardboard frame on top, and in turn pierce with a pin all the marked points.

4. Insert a white wool thread into the needle and tie a knot at its end. This thread must be pulled between the opposite sides of the frame, threading into the holes made. When the thread ends, you need to tie a new piece of thread to its end and continue to pull the thread between the opposite sides of the frame. When the thread is stretched over the entire frame, tie a knot at the end so that it is well stretched.

5. Take a piece of red thread and tie one end of it to a pin. You can start weaving. It is necessary to step back from the edge of the frame about 4 cm and thread the red thread between the stretched white thread - then above the thread, then under the thread. It is important that this order does not go astray.

6. Make 20 rows of red thread. It is necessary to ensure that the rows lie tightly to each other, for this you can adjust the threads with your fingers or a pin. Then tie the yellow thread to the red thread and start weaving with the yellow thread

7. Make 16 rows of yellow thread.

8. Now you need to again tie the red thread to the yellow and continue weaving.

9. Make 20 rows of red thread. Tie the end of the thread to a white thread at the edge of the weave.

10. Scissors cut the white threads holding the mat on the frame.

11. In pairs, tie the free ends of the white threads together - so from two opposite sides you get a fringe, and the rug will not open.
12. On the remaining two sides also make a fringe. To do this, cut 32 pieces of white threads with a length of 10 cm each. 16 threads for each side.

13. Using a hook, stretch the double-folded thread over the edge of the mat. Get a loop.

14. In this loop, stretch the ends of the white thread and tighten.

15. Therefore, make a fringe on both sides.

16. Scissors to trim the fringe.

17. To straighten the mat-stand. It is advisable to gently wash it manually so that the threads straighten and settle more evenly. Dry the mat flattened on a flat surface.
Delivery under the bowl in the form of a small rug is ready.

You can make a whole set of such bright coasters.
Share
Pin
Tweet
Send
Share
Send