Share
Pin
Tweet
Send
Share
Send
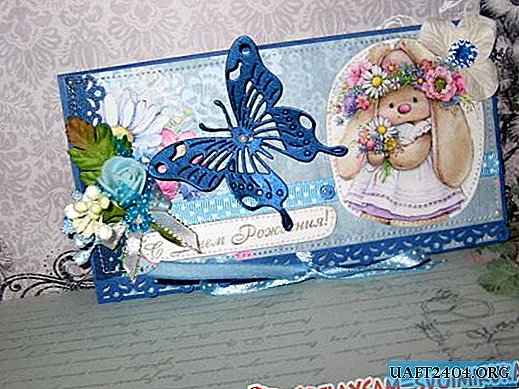
Just now, together with you, we will learn how to make such a money envelope with a bunny and for work we take:
• Blue album sheet of cardboard under the skin;
• Scrapbook paper in blue with daisies;
• Pictures with a hare and a bouquet;
• Cut down mother-of-pearl butterfly of dark blue color;
• Stamp "Happy Birthday";
• A piece of pearl blue cardboard;
• White large hydrangea from paper;
• Brilliant hollow cabochon of blue color, as well as a flower cabochon;
• Blue rose in latex tulle;
• Stamens with glitter;
• Green paper petal on the leg;
• Polka dot ribbon light blue from satin 5 mm wide;
• Blue rep ribbon in peas 10 mm wide;
• Hole puncher;
• Satin white ribbon with lurex;
• half beads;
• scissors;
• glue gun;
• PVA glue;
• Ruler;
• Double-sided tape;
• Pencil;
• Lighter.
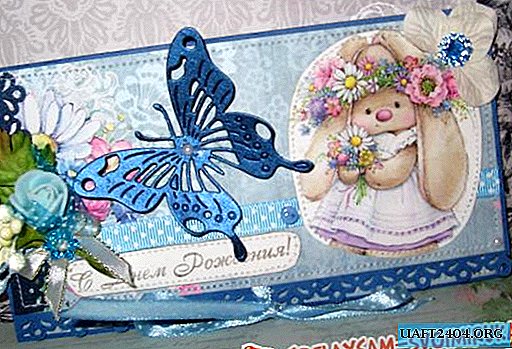

We place the blue cardboard vertically, measure three bases 8 cm, 9 cm and 9.5 cm in height on it. We measure 17.5 cm in width, cut off the excess. We separate each part by bending and fold the workpiece.


With a puncher, we make the bottom and top floral along the border. From a satin ribbon with polka dots, measure 15-16 cm, cut and cauterize, tape it to the back and front parts.


From scrapbook paper we cut out the following scrapbook rectangles: 7.5 * 17 cm, 8 * 17.5 cm and 8.3 * 17 cm.


We go along the side of the larger rectangle with a puncher, and also make a blue openwork strip. On a white sheet we do two stampings "Happy Birthday".


Glue inscriptions and pictures on both rectangles. We glue a mother-of-pearl lace strip and a rep ribbon on the front workpiece. Each scrapbook rectangle is glued to the base. Each sew on the edges of the machine.

Envelope pocket glue PVA. It remains to make a bouquet of flowers, stamens and a leaf, tie it with a bow from a satin ribbon and stick it together with a hollow heart to the envelope. In the upper corner we also glue a flower and a cabochon.


Get a birthday envelope with a cute bunny! Thank you for your attention and good luck to everyone!


Share
Pin
Tweet
Send
Share
Send