Share
Pin
Tweet
Send
Share
Send

Spinner is an interesting little thing for children, although, frankly, I don’t understand what is of interest here ... like, however, the entire older generation. But recently, having looked at this thing in business, I thought, why not do it myself? For the sake of interest - I can, or I can not? And then you can give it back to children, instead of buying ... As I understand it, the main thing in this design is balancing. The more precisely all blades of the structure are balanced, the longer the spinner on the bearing will rotate.
Will need
- Bearing (the smaller the better).
- Plexiglas, 5 millimeters thick.
- Self-adhesive color film.
- Scissors.
- Emery machine.
- Compass.
- Ruler.
- Marker pen with a thin pen.
Stalker Spinner Making
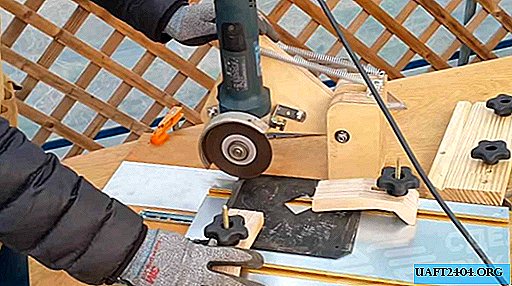
You can purchase a suitable bearing in any auto parts store. So, first you need to cut an even circle from plexiglass on an emery machine. To do this, take a piece of plexiglass, an area of about 8 × 8 centimeters and a thickness of 5 millimeters.

Using a compass, we draw a circle on a Plexiglas, with a diameter of 7 centimeters.

Now, having installed a thin cutting disc on the emery machine, we saw off along the drawn circle. For greater convenience, you can first cut off all the corners, then cut off the remaining pieces until we get a more or less even circle.


Now, on the lateral plane of the disk, align the circle along the strip drawn by the compass.

After the circle is completed, you need to find the middle in it. That is the center. It's as simple as that - there probably remains a mark from the needle of the compass when we pulled out a circle on plexiglass. If suddenly they did not find it (maybe it got stuck during work), then we take a sheet of paper, put our circle from plexiglass on it, draw a marker around it, and cut the same circle out of paper. We put it in four, as even as possible. Smooth over the folds of paper. Expand. The center can immediately be seen at the bend of four sides. According to this template, having attached circles to each other, we mark the center at the circle from plexiglass. Remember; the smoother the circle, and the more precisely the center of the circle is determined, the better the balance will be in the structure, and with perfect balance, the spinner will rotate many times longer than with poor balancing with the same bearing. Now you need to use a ruler and a thin marker to mark the circle in the form of divisions into six equal parts and a small, 1.5 cm, circle in the center - these will be the borders of the holder, for which the spinner is usually held.

Cut out the parts; one through one.


Now it’s the turn of the hole for the bearing. We measure the diameter of the bearing, take a drill suitable for this diameter, and drill a hole in the very center.

If the hole turned out to be small, modify it with a round file, and if it is large, add a layer of electrical tape on the outer surface of the bearing. Insert the bearing into the drilled center of the workpiece.

Do not forget to process the edges of the workpiece with a file, from burrs. The main part is ready. Now you can glue it with colored adhesive film. For such a figure as mine, of course, a poisonous green color (bright lime!) Would do, but since I didn’t have one, yellow also worked.

Now we cut out two circles on an emery machine, 1.5 centimeters each. These will be the holders. They are also glued with a film of the same color.

In the center of each of the holders we drill recesses of 3 millimeters deep (not through!) For the sleeve. The sleeve can be made from any tube of suitable diameter. We insert the sleeve into the bearing and put on the holders on both sides of the spinner.


If the holders hang out, drip a drop of second glue into their recesses. Just make sure that the glue does not get into the bearing mechanism! Otherwise, you have to put a new one! Well, in principle, that’s all ... The DIY Spinner is ready, and your child will appreciate it much better than the purchased one.


Share
Pin
Tweet
Send
Share
Send