Share
Pin
Tweet
Send
Share
Send
Creating a loop on a rope is very simple. To do this, there are a large number of nodes that make this element. However, the nodes themselves sometimes interfere with the work, and some of them do not meet the security parameters. Therefore, it is better to splicing the rope into a loop. This is much larger, but safer, more reliable and more convenient during operation.
Splicing process
First you need to trim the edge of the rope, making it even.
Then we fold the rope, creating a bend with one end 30-40 cm long. This will be our loop.

We mark on the rope the supposed beginning of its formation at both ends. This will be the place of splicing.

It is necessary to measure about 2.5 meters from the beginning of the rope, and in this place tie a knot that can be easily untangled. It will serve as a kind of guard against a strong displacement of the braid along the core of our rope.
For convenience of explanation, we will assign the letters "A" and "B" to the marked points on the rope. In this case, "A" is located closer to the end.

At point "B" we make a small puncture in the braid, trying not to damage the fibers. To do this, they are simply slightly offset from each other. Through the resulting hole, we extract the inner part of the rope, marking it at the puncture site.

In fact, we measure the same distance as from the end to point "B". For ourselves, we mark this mark as "B1".
Next, we draw about 10 cm of the core of the rope from its other end. To do this, just shift the braid.
The ends of the core and the braids of the rope are tied with adhesive tape to prevent them from opening.

The next step is to mark the core to form a loop. To do this, we measure from point "B1" along the long end of the core (towards the hole made) a distance equal to the segment from the beginning of the braid to point "A". So we create the point "C1".


Then from the point "C1" in the direction of the hole made, measure the distance equal to the segment "AB". There we create the point "D1".

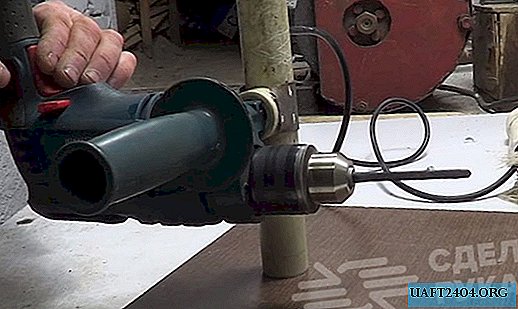
Next, we need a special tool in the form of a small segment of a hollow tube with a diameter slightly larger than the thickness of the rope. It will play the role of a broach, which means that it can be replaced with other convenient devices.
We need to insert a pull into the core of the rope through the points, penetrating only the segment "C1D1". With it, we extend the end of the hollow braid, which is placed in the middle of the core.


From the end of the braid we cut the retainer from the adhesive tape, and the end itself is gently wound into the core under the point "D1". In this case, we shift the braid and core so that the points "A" and "C1" are combined, forming the entrance of the braid inward.


This place must be fixed with adhesive tape to prevent displacement.
Now, with the help of the broach, we pass the core of the rope through its braid, entering point "A" and leaving through point "B". At the same time, we straighten the rope in all its sections.


We remove all the fuses from the adhesive tape, and pull the core through point "B", gradually leveling the rope. To do this, you can tighten the loop. As a result, the entire core will disappear at point "A", pulling a little braid.
The stronger we pull directly on the loop itself, the better it will drag on.


The tip of the core that peeks from point "B". First we mark it under the rope itself. Then we pull it up a bit and cut it as planned.


When we again begin to pull the rope by the loop, the ends will completely disappear under the braid.
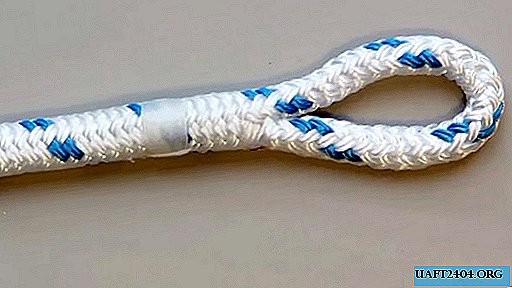
We got a rope completely knit together in a loop and without knots.

Share
Pin
Tweet
Send
Share
Send