Share
Pin
Tweet
Send
Share
Send
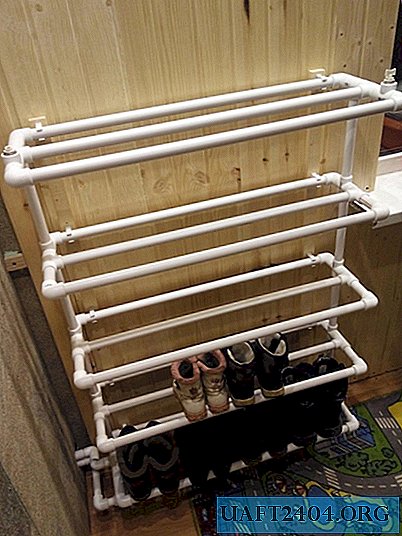
In winter, especially in cities where streets and sidewalks are sprinkled with anti-icing agents, there is a problem of drying shoes, especially for children. It is not recommended to use heating batteries for this: shoes from high temperature can deteriorate (especially with glue), lose their presentation and quickly become worthless.
If you make a shoe dryer from plastic pipes and fittings, the thermal conductivity of which is two orders of magnitude lower than that of metal, then the quality and safety of drying shoes will be ensured by default.
The need for materials by type and quantity
Since the shelves of our dryers will be the same in overall dimensions and configuration, the number of necessary elements will be determined by the number of shelves.
For work, we need a set:
- pipe diameters of 1 inch (the most optimal size) of different lengths;
- fittings (corners, tees, crosses);
- Mayevsky cranes (at least two);
- pipe mounts to the wall;
- lower stops (base).

As tools, you can use the standard kit for working with plastic pipes.
Homemade dryer assembly sequence
1. First, you should decide on the overall dimensions of our homemade products - the width, depth and height, determined by the distance between the shelves and their number. Dimensions are selected depending on the size and number of shoes, as well as the availability of free space for installation.
2. After that, using a saw or knife, you can perform a set of pipe blanks that determine the length, depth and height of the shelves. The main thing here is to observe the same size of tubes in the set. This will facilitate the assembly, tightness and aesthetics of homemade.
3. The most critical stage is the assembly of the lower shelf, which is the base, along which the remaining "floors" of the dryer will be assembled. It is important here, by adjusting the height of the stops, to ensure the horizontalness of the base.

4. Then they are installed and, after checking the horizontal position of the second shelf, the vertical posts are sealed. You may have to trim one of the racks at this stage to ensure the shelves are horizontal.
5. After the assembly of all levels of the dryer is completed, Mayevsky taps are screwed into the corresponding tees from above, so that from time to time or after a long period of inactivity, the air accumulated in the pipes is vented.

6. The final operation is to fasten the dryer using appropriate fixtures to the wall. Each horizontal pipe of our structure must be fixed in at least two places.

7. Now it remains only to supply hot water from the heating system of the house or apartment, make sure that there are no smudges, and the dryer can be used for its intended purpose.

Tips and comments
For the manufacture of dryers, operating from a heating system, it is better to use reinforced polypropylene or metal-plastic pipes. Both materials withstand pressure of 10-15 bar and a temperature of 90-95 degrees Celsius. PVC pipes from heat quickly soften and lose their shape.
You can increase the functionality of the dryer using trays made of rubberized material. Then water and dirt from the shoes on the upper shelves will not fall on the one below. But it’s better, of course, to wash and wipe the shoes before drying.
The uppermost shelf can be used to dry small cloth items: mitten, hats, socks, etc. For this, it is enough to put a plastic grate on the upper pipes.
In order to protect yourself and your neighbors below the floor from flooding and to ensure the possibility of repair, for example, if the dryer is not tight, it is advisable to equip it with a shut-off valve located on the inlet pipe.
Share
Pin
Tweet
Send
Share
Send