Share
Pin
Tweet
Send
Share
Send
On the basis of sound electronic modules, you can make a lot of various homemade products. It can be doorbells, toys speaking a text or some kind of musical fragments, voice acting of important signals or parameters of a car or devices, an answering machine of an intercom, etc. In general, the large scope of application of these sound modules depends only on your fantasies and skills.

Five sound files can be recorded to the board on the JQ6500 chip via the USB connector by connecting it to a computer. At the same time, the sound file download program is loaded, wired into the module. We select the necessary files in MP3 format, then upload to the module.

Contacts K1-K5 are used to play files loaded into the JQ6500 memory, short the desired contact to ground and play the corresponding sound file. Contacts SPK +, SPK- for connecting a speaker. Contacts DC-5V, GND for supplying voltage of 5 volts.
The 8002A microcircuit, installed on the reverse side of the board, represents a 2 W low-frequency amplifier providing a good sound volume.

First, for verification, we assemble this standard circuit on a breadboard.


We check the circuit, all recorded speech signals should play normally.
This module can be used in a car to reproduce reminiscent speech signals, for example, the tailgate is not closed, the parking brake is on, the door is open, the main beam is on (dimensions, dipped beam), etc.
To do this, you need to assemble another connection diagram.

We take a +12 volt signal from the main beam lamp. Through a divider of two resistors, the voltage decreases to +5 Volts and is fed to the inverter on the K155LA3 chip. At the inverter output, we get a signal of a logical unit and, accordingly, the JQ6500 module will lose the speech file.
Will need
For the manufacture of this homemade needed:
- - JQ6500 module board -1pcs;
- - loudspeaker with a power of 0.5 W -1pcs;
- -Case from the doorbell -1pcs;
- -1pcs lowering board;
- -amplifier PAM8403-1pcs;
- Microcircuit K155LA3-1pcs;
- -resistors 10 kOhm and 1 kOhm - 4 pcs;
- -bread board;
- -connecting wires;
- soldering iron;
- -Klemnik.
Manufacturing Informant
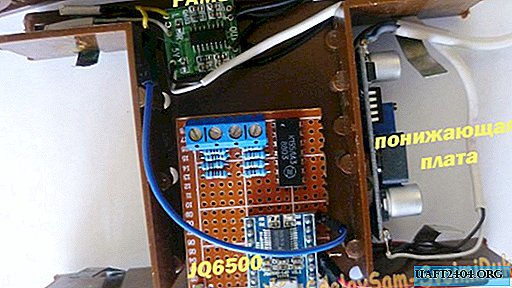
We cut off the necessary piece from the breadboard and place on it the JQ6500 module, K155LA3 chip, resistors and terminal block (for connecting input control signals). Using thin wires, solder the circuit. Everyone in the circuit board has a negative power bus.

To increase the volume, you can connect an additional PAM8403 sound amplifier.
The lowering board is used to convert the voltage of the on-board network of 12 Volts to the supply voltage of the 5 Volt modules.
All shawls are well placed in the case from the old doorbell.

In the car, the device is connected to the on-board network of 12 Volts and through the terminal block we feed the input control signals.
It turned out an interesting inexpensive device for making audio signals in the car and in many other areas of application, made by hand.

The video shows the verification process and device test.
Share
Pin
Tweet
Send
Share
Send