Share
Pin
Tweet
Send
Share
Send
Will need
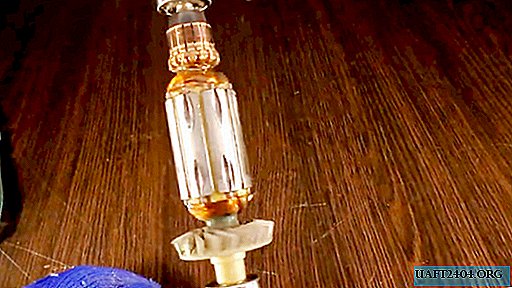
In addition to a non-deficient anchor, which can be removed from a burned-out drill, grinder, etc., or easily found at a metal collection point, we must have:
- vice is metalwork;
- bearing puller;
- hacksaw for metal;
- gas burner or electric oven;
- flat screwdriver;
- pliers;
- sandpaper of different grain size.
Technology for converting anchors into tools
This is not difficult to do, even having the initial skills of plumbing. We remove from the anchor all removable parts - nuts, rings, gears, bearings, using a puller, hammer and pliers.


Using a hacksaw for metal, we cut off the part of the anchor on which the contact plates of the brush assembly are located, cutting strictly along the end of the magnetic circuit, after fixing the rotor in the jaws of a bench vice.


We remove the copper winding of the anchor from the magnetic circuit. To do this, we fasten it vertically to the shaft in a vice and, using a gas burner, heat up and evaporate the varnish of the armature winding.

You can heat the rotor in one place. Since copper is an excellent conductor of not only electricity but also heat, it will quickly spread throughout the winding and melt the insulating varnish.
As soon as the varnish begins to boil and begins to drip on the other side of the anchor, heating can be completed and proceed to remove the winding, picking it out with a screwdriver and pulling out the grooves of the magnetic circuit with pliers. If the process becomes difficult, you can again warm up the coil a little with the flame of a gas burner.


After removing the entire winding from the magnetic circuit, a system of through holes and grooves opens, which were previously filled with a copper winding and filled with varnish.
Using available means, we clean the magnetic circuit from soot and the remnants of electrical insulating varnish.

It remains for us to supply the magnetic core-nozzle with pieces of sandpaper of the same length, which are very simply and securely mounted in the grooves.

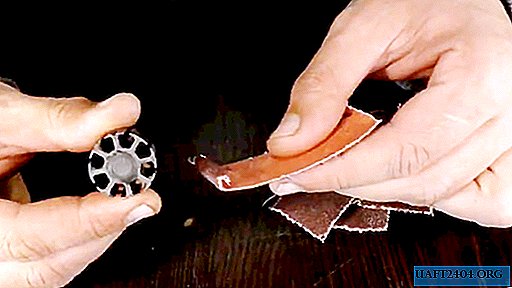
The result is a very effective abrasive tool that, depending on the number of emery tape, can perform certain operations.

Practical use
Let's check our home-made abrasive tool in action.

To do this, we fix the shaft of the former anchor, which now serves as the shank, into the drill chuck, and grind the surface of the wooden and metal workpiece. The result is excellent, and the process is effective.


Homemade nozzle can be used in a slightly different way. We take a piece of sandpaper, equal in length to the size of the nozzle circumference, and bend its ends at an angle. We grab the nozzle with it, and we bend the bent and closed ends into the groove.


This version of the nozzle is able to easily and quickly perform cylindrical recesses in wooden and metal blanks.
Both versions of the tool allow you to bore, grind and polish various surfaces and holes.


Share
Pin
Tweet
Send
Share
Send